Automating Nucleic Acid Extraction
Automating nucleic acid extraction can be a particularly challenging project because of the diversity of biological specimens, extraction chemistries and technologies. You and your automation partners will need a thorough understanding of chemistry, biology and robotics.
View this on-demand webinar for more information on how to efficiently build and troubleshoot an automated nucleic acid extraction workflow.
Developing an Automated Nucleic Acid Extraction Workflow
Nucleic acid extraction is the basis for dozens of different downstream applications and analyses. Automating this process can help your lab achieve higher throughputs, improve precision and more. However, developing a workflow compatible with your sample type that meets your quality requirements will require a lot of planning, testing and optimization. You also need to understand robotics, handling biological samples, extraction chemistry and how to assess the extraction performance.
The resources on this page will help you develop your own automated nucleic acid extraction workflow. You’ll learn about:
- Nucleic acid extraction using magnetic particles and liquid handling robots.
- The foundational work you need before working with a robot.
- How to build and troubleshoot an automated nucleic acid extraction workflow.
If you are looking for assistance with optimizing or building new automated extraction methods, our Technical Scientists can help.
The Fundamentals of Automated Nucleic Acid Extraction

How do bead-based nucleic acid extractions work?
While most benchtop methods for nucleic acid extraction use filter-based spin-column methods, automated workflows most often use magnetic beads that reversibly bind nucleic acids. These beads, also called magnetic particles, can be easily manipulated and controlled by a robot. However, they are more unwieldly than spin-columns and present unique challenges, including poor bead dispersal due to high levels of impurities in a sample or using heavier beads.
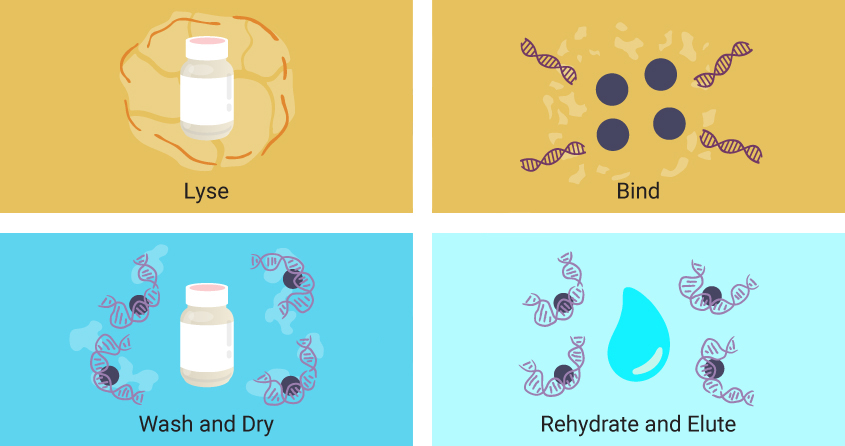
Though specific reagents may vary, magnetic particle-based extractions follow the same four basic steps.
- First, a lysing solution is added to the sample, breaking apart cells and releasing nucleic acids into solution.
- Magnetic particles coated with a material that enables reversible binding of nucleic acids are added.
- The particles are washed, often with buffers containing ethanol to remove salts, detergents and remaining cellular debris while leaving nucleic acids bound to the magnetic particles.
- Finally, water is added to the particles, rehydrating and releasing the nucleic acids from the magnetic particles.
This chemistry can be automated using programmable robotic operations that manipulate the magnetic beads.
How do particle mover and liquid handler robots work?
There are two main robot types for carrying out automated nucleic acid extractions: particle moving robots and liquid handling robots.
Particle movers attract magnetic beads to a magnetic rod. The beads are moved with the rods to wells pre-filled with extraction reagents. When the beads reach a well, magnetization stops, and the beads are released. Mixing disperses the beads throughout the solution. Then, the rod is re-magnetized, and the beads are moved to another well.
In contrast, liquid handlers transfer liquid reagents to or from wells. Magnetic beads are magnetically immobilized inside the well during liquid transfers.
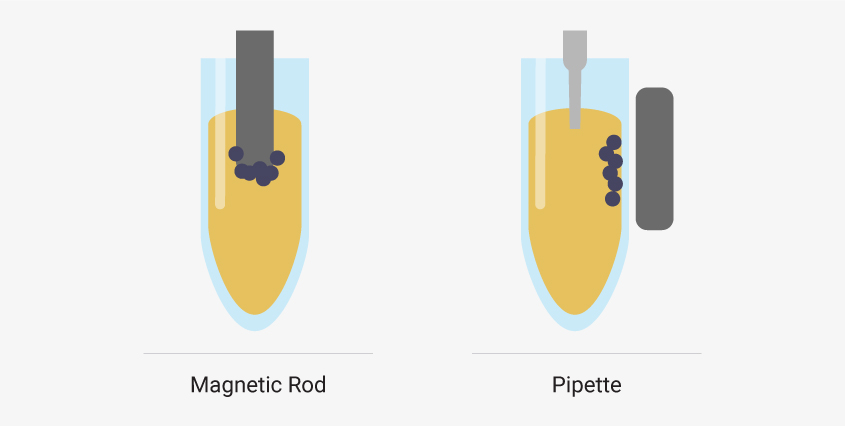
Particle moving robots attract magnetic beads to a rod and move beads to wells pre-filled with reagents. Liquid handler robots use pipettes to transfer liquids while magnetic beads are held in place by an external magnet.
In this guide, we focus on liquid handler robots because methods for these platforms tend to be more difficult to build, but many of the principles still apply to particle moving robots.
Simple, load and go Maxwell® instruments use particle mover technology to extract nucleic acids from any sample type. Learn about Maxwell® Instruments.
Looking for high throughput liquid handling solutions? Our experienced Field Support Scientists can help you incorporate our reliable nucleic acid extraction chemistry onto your preferred liquid handling platform. Learn More.
A liquid handling robot carries out four basic functions during an automated extraction workflow:
- Liquid moving
- Magnetization
- Mixing
- Temperature control
You’ll need to understand robotics and magnetic bead-based extraction chemistry before creating an automated nucleic acid extraction workflow.

A molecular biologist can easily troubleshoot poor reagent mixing during a manual extraction with a viscous sample. But what would that look like on a robot? In contrast, an engineer may know how to write a script that programs a robot with all necessary mixing, pipetting and magnetization steps. But what steps can be optimized to troubleshoot a protein impurity? It’s important to have a collaborative team of experts who understand the biology, chemistry and technology that goes into automating a nucleic acid extraction workflow.
What are the first steps to automating nucleic acid extraction?
It might surprise you that the first step to automate your nucleic acid extraction isn’t programming a robot. Instead, the first steps are to:
- Establish the requirements and controls for your extraction workflow, including the quality of the extracted nucleic acid and the throughput rate for your samples.
- Establish a manual magnetic particle-based extraction method that meets or exceeds your quality standards.
For the workflow requirements, in general, you’ll want:
- High purity (contaminates can inhibit downstream steps like PCR).
- Acceptable recovery or yield.
- A workflow that meets required processing times.
- Acceptable volumes of eluted nucleic acid samples.
- No cross-contamination of samples.
The precise thresholds for each requirement will depend on your application.
Here are some example requirements you may have for your nucleic acid extraction workflow.
- A260/A230 > 1.8 (free of salt contaminates)
- A260/A280 > 1.8 (free of protein contaminates)
- Extraction control achieves acceptable yields (for example, > 80%) from sample type(s) of interest to serve as a benchmark for automation.
- Extraction control achieves acceptable yields (for example, > 80%) of input nucleic acid (such as spiked-in nucleic acids).
- Eluted nucleic acids are functional for downstream applications like qPCR or next-generation sequencing.
- Less than one cycle difference in PCR amplification compared to a control.
- 50µl eluted nucleic acids.
- 1.5h robot processing time.
- Automated throughput of 12–96 samples per run.
Before working with a robot, you must develop a manual extraction method that meets and exceeds your requirements. An automated extraction may be more consistent and have higher throughput, but final yields and purity will rarely be better than what you can achieve manually. A manual extraction method that works well will be a vital control when you begin optimizing an automated workflow on a robotic platform. This upfront work will show you how your sample behaves during the extraction workflow and what steps could also be challenging with a robot.
A manual extraction method that works well will be a vital control when you begin optimizing an automated workflow on a robotic platform.
If you struggle to get high yields and purity from a manual method that uses the same reagents as your planned automation, the automated method will almost certainly be worse. There are too many variables to control if you attempt to optimize extraction chemistry and robotics at the same time. Your manual method provides a set of controls to assess the performance of an automated workflow. Being able to quickly identify failure points of an automated workflow can save you days or weeks of work.
To get started, you’ll manually optimize the steps of a magnetic particle-based extraction using the same reagents, sample type and extraction kit that you intend to use for the automated workflow. Use pipettes and a magnet to manipulate the liquids and magnetic particles.
Though you must develop your manual method using your intended sample type, there are additional, simpler sample types that can help you troubleshoot certain steps of your extraction. Starting with purified DNA such as a DNA ladder or purified genomic DNA can reveal if your method leads to inadequate yields or introduces impurities without the complexities of a sample matrix and cellular debris. Cell cultures like HeLa cells can also be a valuable test sample type because you can control the number of cells—and nucleic acid—added. These models are useful, but you shouldn’t optimize your entire method with them. Run them in parallel or as needed to troubleshoot a specific step. If these simple model systems are failing to meet your requirements, then a complex matrix like whole blood will fail.
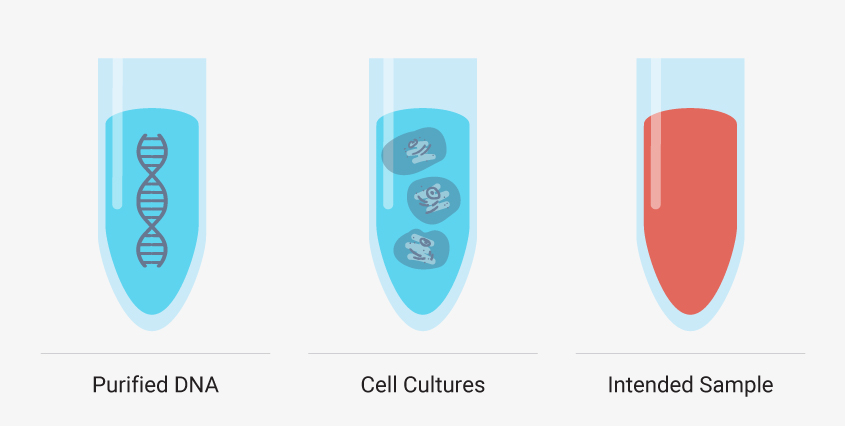
It can be helpful to see how your optimized manual nucleic acid extraction performs with more controlled sample types, such as DNA ladders and standard cell cultures, but creating a method that works for your desired sample type is a must.
What should you check when optimizing a manual extraction method?
Did the nucleic acids bind completely to the magnetic particle?
Nucleic acids need enough time to “bump into” the magnetic particles. To make sure you have enough mixing time and intensity in your manual method, it’s typically enough to mix the bead suspension by pipetting a few times and mixing with a rotator or vortex for about 10 minutes. The manufacturer of the extraction kit may also have suggested mixing times and methods. Visually check to make sure the beads remain suspended.
Were the beads washed sufficiently?
Magnetic beads tend to aggregate when biologic materials are present. Unless the beads are fully resuspended and dispersed during wash steps, proteins and other contaminants will be trapped in the aggregates. Use pipetting to resuspend beads during wash steps. Watch to make sure the beads disperse fully. At that point, the wash should be done.
Be sure to change tubes after washing steps. Salts from the extraction reagents can get trapped in the cap and edges and will reduce sample purity. This won’t be a problem when you move to an automated method.
Were the beads dried properly?
If your beads are not sufficiently dried, residual alcohol from wash steps won’t be removed. Alcohol reagents can reduce recovery of nucleic acids and will contaminate your eluate. However, if your beads are dried for too long, the nucleic acids can be hard to rehydrate and elute. You’ll have very low recovery.
Different magnetic particles can have unique properties, so follow the drying times recommended by the particle manufacturer. If instructions are not clear, then room temperature drying for approximately 20–30 minutes is a great starting point.
How can robotic operations affect extraction quality?
Once you have a manual method for magnetic bead-based nucleic acid extraction that consistently meets your requirements, you are ready to work with a robotics platform.
Liquid Moving
Not all liquids have the same density or viscosity. If you don’t define these attributes for the robotic platform, your robot can drip during transfers, or it won’t transfer correct liquid volumes. Just because the volume of liquid transferred by the robot looks about correct, there can still be discrepancies. You can alleviate these problems by defining the liquid classes the platform will handle.
If you’re using an extraction kit, you can ask the manufacturer for the kit’s liquid classes. The manufacturer of the liquid handling robot may also provide suggestions. The robot may also have pre-programmed liquid classes as a starting point for you.
Once you program the liquid classes to draw up and dispense the correct volumes without dripping, there are other ways to improve liquid moving.
- Draw a small volume of air into the handler’s pipette before drawing up liquids to help dispense the entire liquid volume.
- After loading the pipette with liquid, draw up some air to prevent dripping.
- Pre-wetting pipettes by pipetting liquid two to three times before drawing up the desired volume can improve accuracy. This is especially true for viscous liquids.
- If you’re working with viscous liquids, you can draw extra reagent into the pipette to make sure the correct volume is dispensed.
- For liquids that are difficult to pipette, you can immerse the pipette tip into the liquid layer while dispensing. This tip should not be used for repeated dispensing .
Magnetization
There are two common types of magnetic stands in liquid handling robots. Ring magnets draw the magnetic beads to a horizontal band along the wall of the sample well. These are best if you’re working with low elution volumes. The robot can remove nearly all the supernatant from the well without removing beads. Post magnets draw beads to the side wall of the well in a vertical line. It can be easier to automate a system that uses post magnets because the beads migrate away from the bottom of the well and out of the path of the pipette. However, larger elution volumes are required.
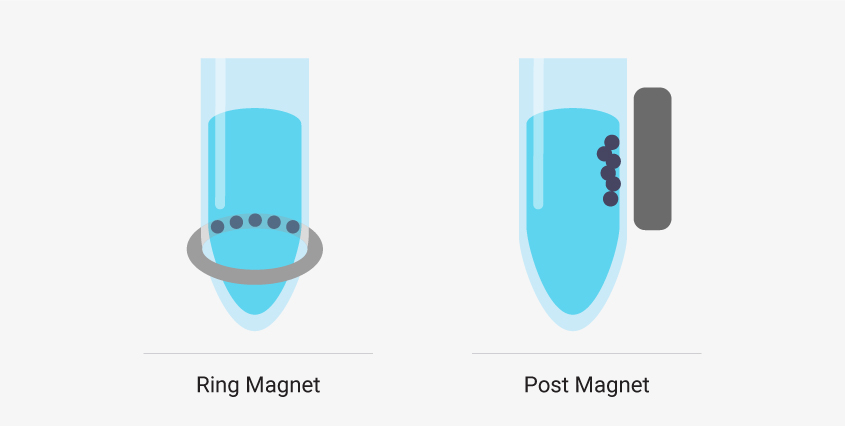
Liquid handling robots designed to work with magnetic bead-based systems may use different types of magnetic stands, and, depending on your system, there can be advantages to using one type over another.
If the robot does not fully immobilize the magnetic beads, some can be lost. This will reduce your nucleic acid yields. Adjusting magnetization time can fix this. It is usually sufficient to magnetize for one to three minutes. Visually inspect the sample to ensure the beads are fully collected at the magnet.
Mixing
Mixing is where most problems in automated nucleic acid extractions occur. Binding, washing and the elution steps all require efficient mixing. Poor mixing can lead to low nucleic acid yields and purity. The main factors that affect mixing are solution viscosity, solution miscibility, magnetic particle size and particle density. For example, some liquids added during the extraction workflow may not be very miscible or are too viscous and components won’t mix well.
Liquid handling robots can use a shaker or pipet to mix.
For a shaker, make sure a vortex fully forms and the magnetic particles fully disperse and suspend. If it is difficult to see, recording a video that you can playback in slow motion can help. Using the maximum shaker speed is not always a good solution to poor mixing—it might just splash your sample.
Pipet mixing can mix viscous solutions well, but it’s usually only feasible for low throughput platforms.
Pipet mixing takes a long time. For a robot with an 8-channel pipette, it takes two hours to mix 96 samples for a 10-minute binding step. For systems that will require pipette mixing, you should consider using a particle moving robot or a liquid handling robot with a 96-channel pipette.
Temperature
Finally, there’s temperature control. Applying the wrong temperatures can lead to poor yields and low nucleic acid quality for several reasons:
- Enzymes used in the extraction require specific temperatures for maximum activity.
- High temperatures during the drying step or drying too long can over-dry the magnetic beads.
- Low temperatures during the drying step may cause impurities to be left behind.
Use a thermometer to test if the robot achieves the programmed temperatures. Follow recommended temperatures and drying times for your extraction kit.
How do you optimize and troubleshoot an automated method?
There are six core steps to most automated nucleic acid extraction workflows using magnetic particles and there are many variables to optimize in these steps. However, you can develop each step incrementally using your manual extraction method as a control.
Optimize each step in sequential order. After each step, or series of steps, with the robot, finish the extraction manually. This will let you assess the quality of the automated step compared to the manual control. You can save time if you visually inspect that certain criteria are met at each step. For example, make sure particles are suspended during a binding or wash before moving on. When yield, purity or other requirements are lower than what you would get with the manual method, then you must optimize the most recent automated step. If the quality is acceptable, you can move on to the next step in the automated workflow.
As you optimize, always keep your process requirements in mind. It’s easy to over-optimize steps that will not greatly influence the extraction workflow outcome or your downstream application. But losses in yield also compound over multiple steps. You’ll need to decide what is an adequate balance. For example, consider optimizing liquid handling for whole blood samples. Because the samples are typically viscous, a 5–10% error in pipetting volumes may be an acceptable performance compromise. But dripping that contaminates other samples is not.
Here are the six core automation steps and some tips that will help you address their most common challenges.
Lysis and Digestion
If you’re using an extraction kit, follow the recommended steps. Order of addition can seriously impact extraction performance. For example, you should only add proteinase to your sample or a mix of your sample and digestion reagents. Adding proteinase directly to digestion reagents will reduce the efficiency of the lysis and digestion step. Temperature is also critical. Keep an eye on your samples. Unexpected cloudiness or viscosity compared to your manual control may mean the temperature is too high.
Binding
This step is all about mixing! Make sure that particles are fully and evenly suspended throughout the sample. If you’re using a shaker, watch and make sure a vortex is fully formed. During this step, volumes are often large and maximum vortex mixing speeds cannot be used. Splashing during the binding step is the second most common cause of well-to-well cross contamination (after dripping during liquid transfers). A standard 2ml well plate can typically handle 1.0 to 1.2ml of liquid before cross contamination during mixing becomes a problem.
For viscous liquids like blood, it might be hard to resuspend particles once they settle. Starting the mixing before adding the magnetic particles can keep the particles suspended.
You can also mix by pipetting if your throughput requirements are low or if your robotics setup allows it.
Magnetization
If you observe lower than expected yields, insufficient magnetization of the beads may be the cause.
Immobilizing the magnetic beads is controlled by three parameters: the position of the magnets, the amount of magnetic field applied and the quantity of magnetic particles. Watch the beads during this step. Make sure they’re fully collected. Magnetizing the post for one to three minutes is typically enough. If you are using a ring magnet, make sure there’s a clear gap in the center of the well for the pipette. If there is not a clear path for the pipette to the bottom of the well, reduce the number of beads in your extraction.
Washing
If the A260/A230 or A260/A280 values of your sample decrease while optimizing the washing stage, impurities likely weren’t fully washed away.
Your method will likely involve several washes. The first is the most challenging and most important to optimize. There are many proteins in the sample at this point. These proteins can cause the beads to aggregate and trap impurities. The magnetic particles must be fully resuspended to release and wash away these impurities. Good mixing is crucial.
Try increasing the shaker speeds to improve bead suspension during the first wash. Volumes should be low at this stage, so the risk of splashing is low. If you do need to mix by pipetting, consider using a particle mover robot or a 96-channel pipette on the platform or your throughput will drastically decrease. If faster mixing doesn’t improve bead suspension, try washing the sample with water or TE buffer and mixing vigorously. This elutes nucleic acids from the beads and breaks aggregates. Rebind the nucleic acids by adding binding buffer at the exact ratios used in the binding step.
If the beads are fully suspended during the wash step and you still see low purity, there might be a problem with liquid handling on the robot. If the robot does not fully take up supernatant during the wash steps, impurities can persist. You can adjust liquid transfer volumes. You can also add another wash to dilute the lingering contaminants. Use a polar, non-viscous solution like 80–95% ethanol or the solution used for the recommended final wash.
Drying
Follow the kit manufacturer’s instructions or your manual protocol for drying. Drying at room temperature is slower but tends to give consistent results. Higher temperatures accelerate drying but can over dry particles and give lower yields until optimized. To maximize processing speed, you will likely need to optimize the temperature and timing of this step.
Elution
Elution is only affected by a few parameters—mixing and temperature. In general, heated elution is not necessary, but it can improve yields. The most important element in this step is effective mixing for at least one to three minutes.
How to Automate Nucleic Acid Extraction Guide
Plan your lab automation project with this guide.